DOCUMENTATION.
HEDDA.IO End User Documentation
HEDDA.IO End User Documentation
1. Homepage
Accessing Hedda will land you on the homepage of the app. On this screen, you can select a Project, add a Project, access the app settings and the help menu.
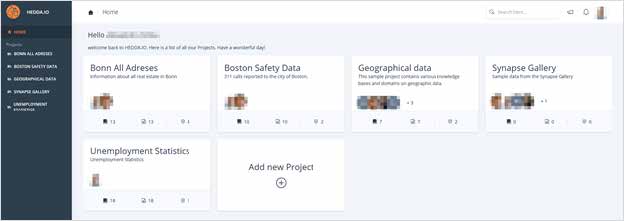
Figure 1: image_homepage
On the bottom of the homepage, on the left we have two buttons:
- Settings-willdisplaytheconfigurationoftheapp
- Help – willserveasintegrateddocumentation
On the bottom right, we can see the current version of the application.
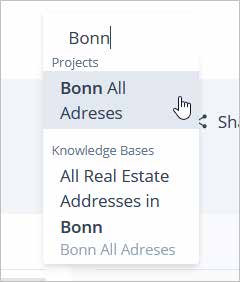
On the top right corner of the screen, you can see a search bar and 3 buttons on the right.

- The search bar will look for Projects, KnowledgeBases, Domains, Business Rules, and Runs with names that match the input text.
- The bell icon will display all the recent notifications.
Clicking on the user icon on the far right, will allow you to generate an API key and change the display language of the application.
A User will always have only one (1) API key. Generating a new API key will invalidate the one previously generated.
![]()
Figure 2: image_homepagebottom
1.1 Side Navigation Menu
The Side Navigation Menu on the left side is present throughout the entire app, and you can access it at any time.
It contains the list of Projects as well as all their respective nested objects, such as Dashboard, and a list of Knowledge Bases created within the respective Project.
1.2 HomeDashboard
In this section, you will see every Project you’ve created or have access to and thus have been shared with you.
On each of the Project buttons in the dashboard, 2 icons are placed, each having a counter by its side. From left to right:
- The number of Knowledge Bases created in the respective Project.
- The number of Domains created in each Knowledge Base available in the respective Project.
- The number of Rulebooks created in each Knowledge Base available in the respective Project.
2. Projects
The Projects are containers that hold all the objects related to it.
The Projects are listed in the Side Navigation Menu on the left side of the screen, and are represented by this icon. They are also listed in the center of the home screen.
When clicking on a Project in the Side Navigation Menu, the Project element will expand thus revealing a number of additional sub elements: 1. Dashboard. 2. Knowledge Base (If the Project contains more than one Knowledge Base, all of them will be listed).
All the above will be covered further down this document.
2.0.1 AddProject
Adding a new Project is as simple as clicking on the “Add new Project” button on the dashboard.
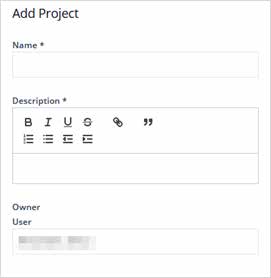
Figure 3: image_addProject_panel
A form will slide from the right, with a Project creation form: Enter a name and a description for the
Project and click on “Save” on the bottom of the form, to create the Project.
By default, the owner label displays the name of the user creating the Project, which is the name of the account currently using the application. However, a different owner can be assigned.
2.1 ProjectDashboard
The Dashboard is the place where we check on execution statistics, details of the Project, the list of users that have access to it, as well as the Knowledge Bases that were created for the Project.
The screen is split into 3 sections:
- Dashboard/ Execution information
- Knowledge Bases
- Project Details
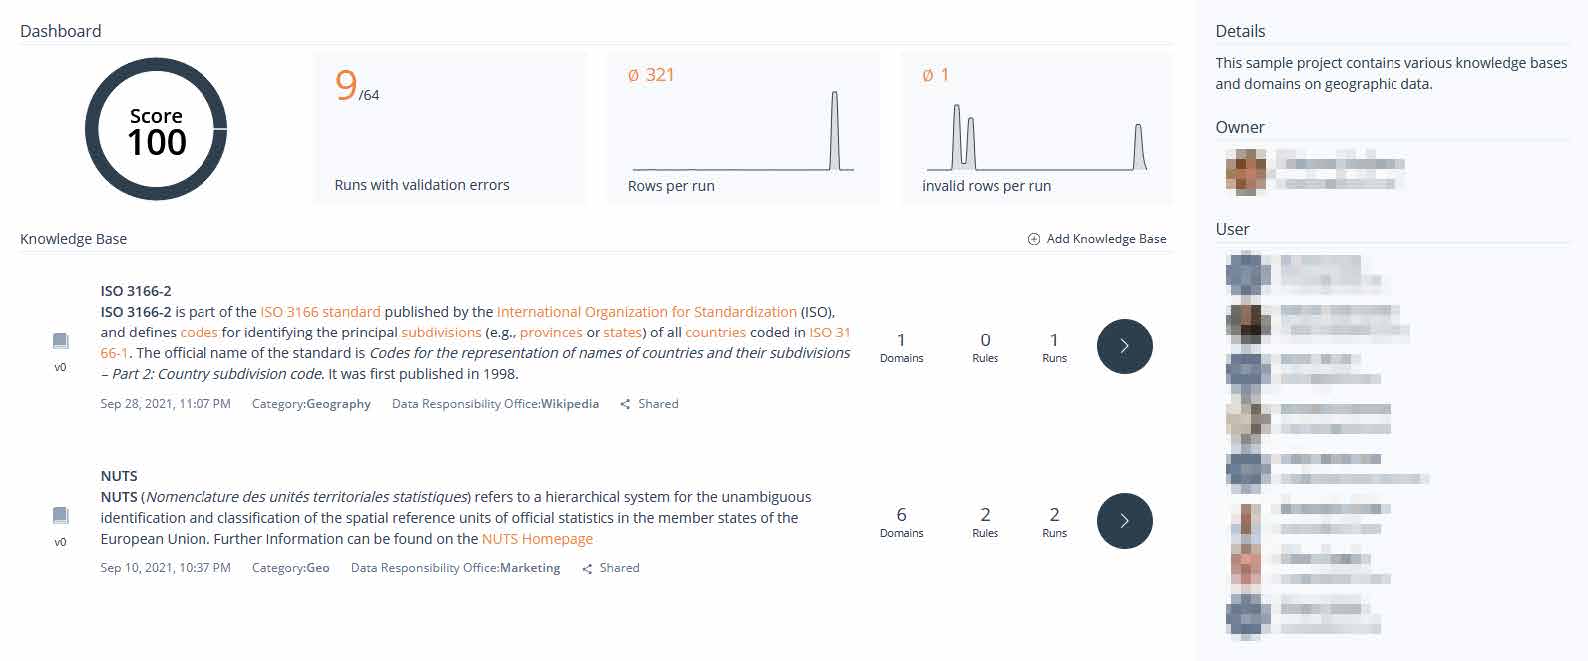
Figure 4: image_Project_dashboard_overview
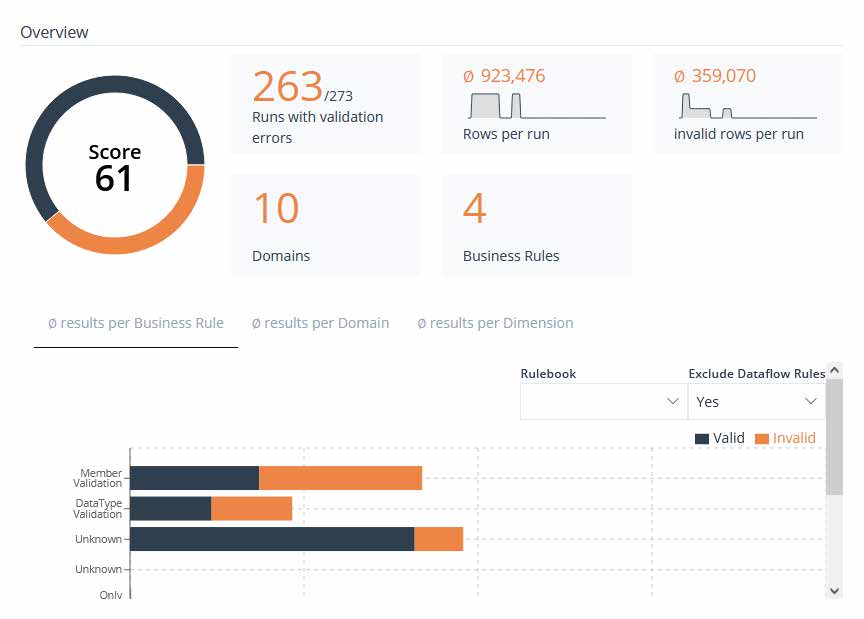
2.1.1 Dashboard/ExecutionInformation
This section displays several useful information about the Project previous Runs.
From left to right. – This section will display the overall score of the Project. – This will display the number of Runs, out of the overall number of Runs, that had validation errors. – This will display the number of overall rows that were checked per Run. – Finally, the number of invalid rows per Run.

Figure 5: image_Project_dashboard
2.2 KnowledgeBaseList
This section displays the Knowledge Base list within the respective Project.
You can scroll up and down, select the Knowledge Base you want to check or edit, or add a new Knowledge Base.
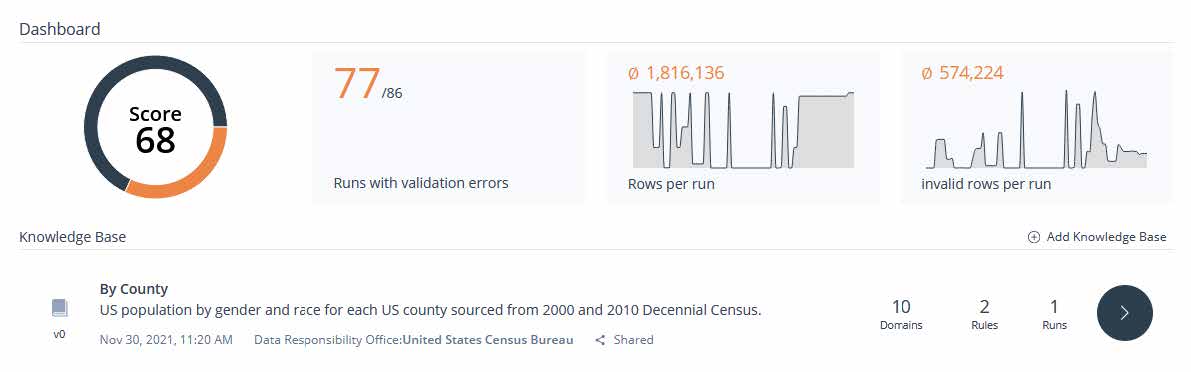
Figure 6: image_Project_knowledgebases
Each Knowledge Base elements in the list contains the following information: – Name – Description –
Create/edit date – Data Responsibility Office – Domain count – Business Rules count – Runs count
Clicking on the Arrow on the right side of the Knowledge Base element will open the Knowledge Base screen.
For an in-depth look at the Knowledge Bases, click here.
2.3 AddKnowledgeBase
Clicking on the “Add Knowledge Base” button, just above the Knowledge Base list, will open the Add Knowledge Base form.

Figure 7: image_addknowledgebase_panel
This panel has 3 tabs that provide different options of adding a Knowledge Base: – Create New – Import
2.3.1 CreateNew
In this tab, you can create a Knowledge Base from scratch. The “Name” input is the only requirement, the rest of the fields are optional.
2.3.2 Import
The importing process is made in 3 steps, Select Provider, Select Knowledge Bases, and FInalize. It allows you to import a Knowledge Bases from 3 different sources – Local File – Azure Data Lake – SQL Server
2.3.2.1 Local File
Load a Knowledge Base from a configured local .parquet file.
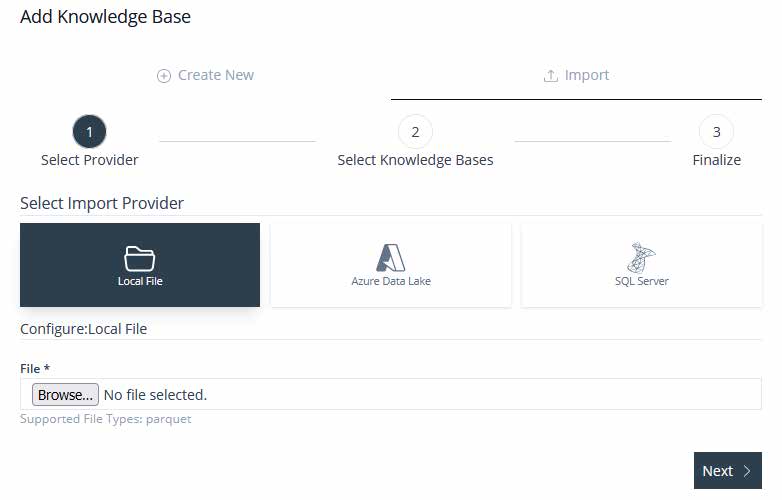
Figure 8: image_addknowledgebase_import_localfile
Once the file is selected, click “Next”. The next step and final step, besides adding a name, a description, a data responsibility office, and a category, will allow you to also select the domains you want to be imported in your new knowledge base.
By default, all domains will be selected to be added to the knowledge base. Simply clicking on a domain, will toggle it off, thus leaving them out.
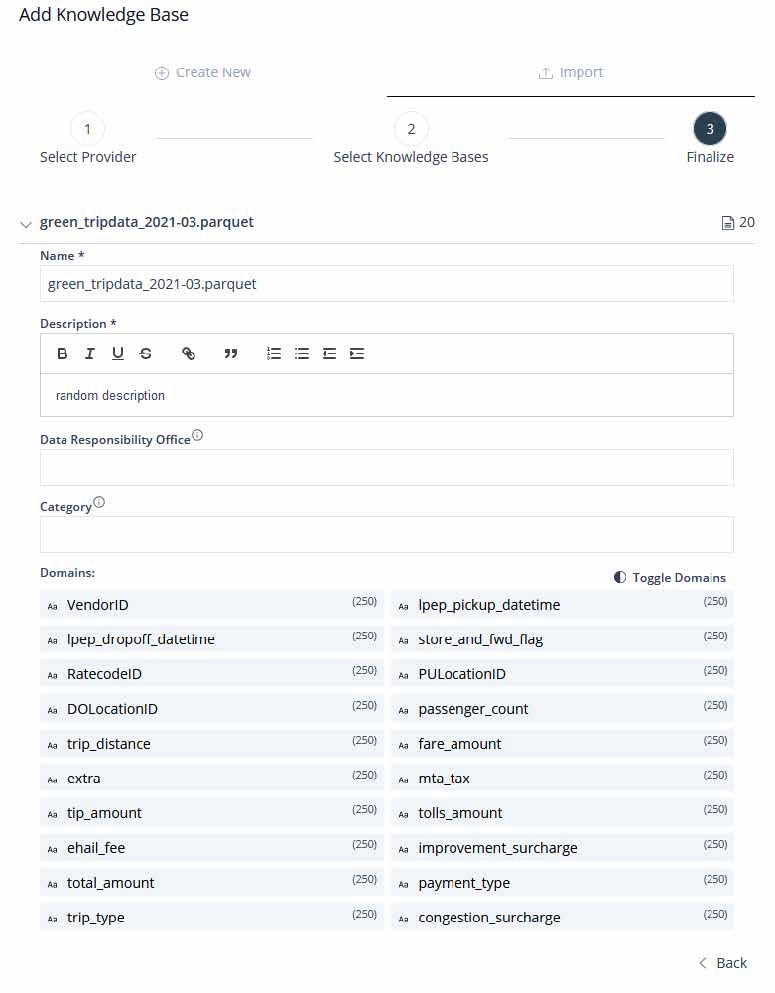
Figure 9: image_addknowledgebase_import_localfile
“Toggle Domains” will check the unchecked or unchecked the checked items.
Once done, click “Save” at the bottom of the menu, to finalize the importing process. Your new knowledge base should appear in the list under the specified name.
2.3.2.2 Azure
Data Lake Load a Knowledge Base form an Azure Data Lake
This import type requires you to input: – An account name. – An access key to the account. – The name
of the container the file is stored in. – The path to the file within the specified container.
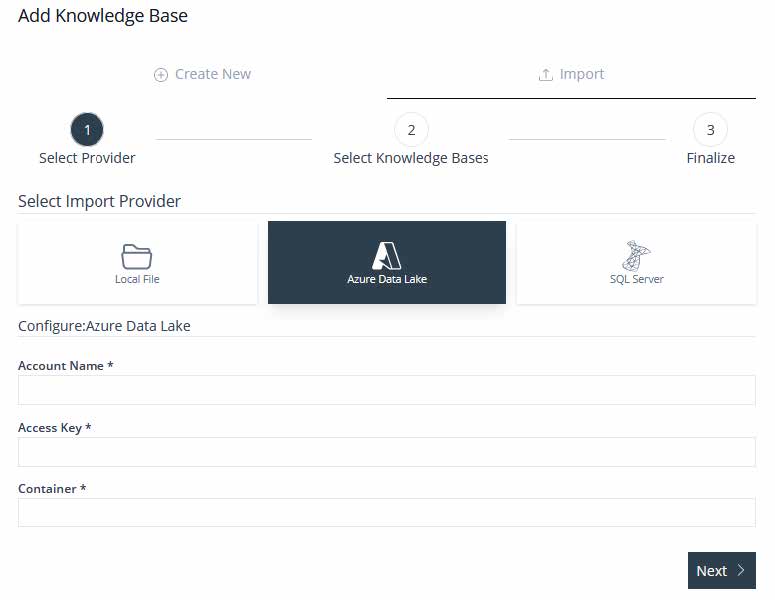
Figure 10: image_addknowledgebase_import_azuredatalake
2.3.2.3 SQL Server
Import a table or multiple table from an SQL database, as Knowledge Bases. The only requisites are: 1. The connection string to the SQL server.
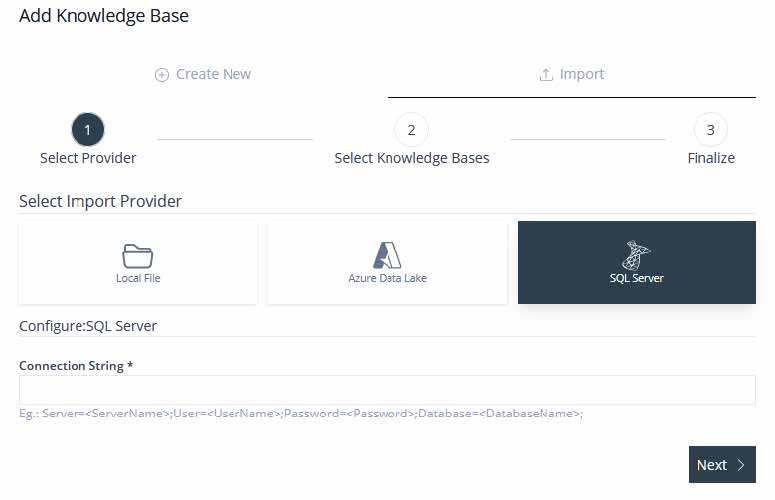
Figure 11: image_addknowledgebase_import_sqlserver
2. Available table/s to select. Note, you can select multiple tables, each will be imported as separate
knowledge bases.
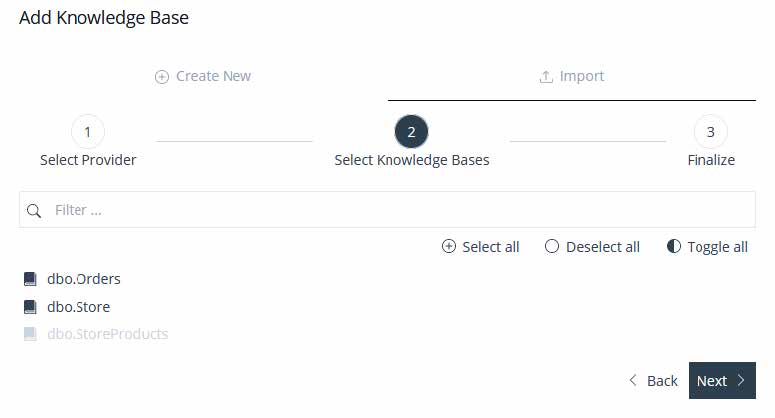
Figure 12: image_addknowledgebase_import_sqlserver
3. Edit the imported knowledge base/s before adding them to the project.
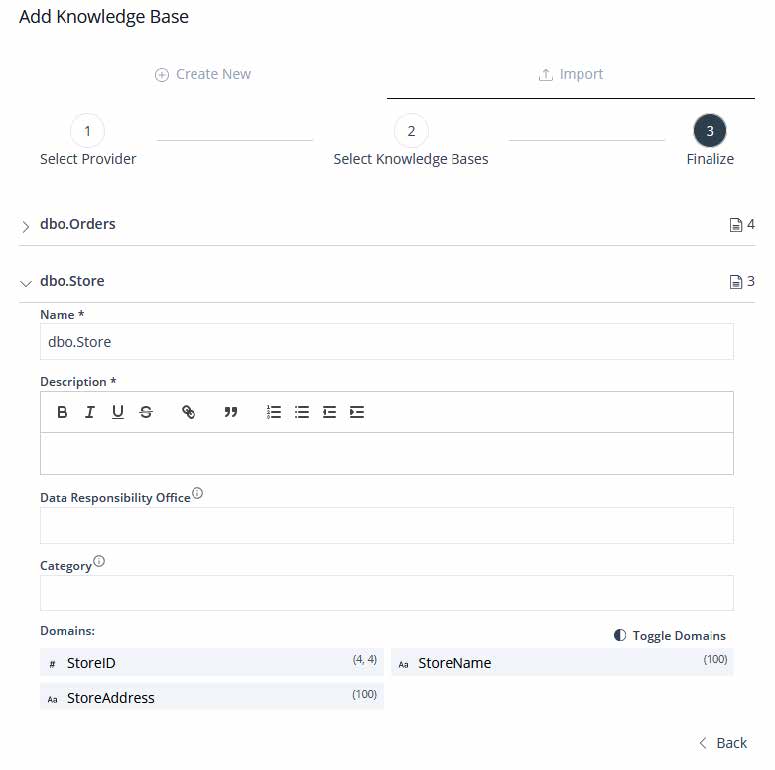
Figure 13: image_addknowledgebase_import_sqlserver
2.3.3 ProjectDetails
To the right side of the Project dashboard, we see the Details section. In the top right corner of the section, we have an Edit button which allows you to modify the Name, the Description, and the Owner of the Project.
Below the Details section, we see the name of the Project Owner, and just below that, a list of users that have any kind of access to this Project, as well as a button called “Manager User” that allows you to manage user permissions.
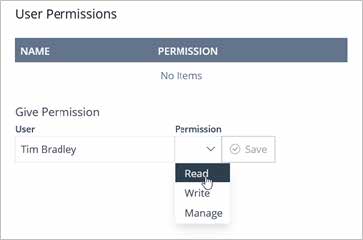
Figure 14: image_Project_userpermission
3. KnowledgeBase
3.1 KnowledgeBase-Dashboard
This is the tab on which you land every time you access a Knowledge Base. The interface is split into 2 sections: – Overview – Details
3.1.1 KnowledgeBaseOverview
On the Overview side you will have statistics about recent Runs, as well as results per Business Rule and results per Domain.
3.1.2 KnowledgeBaseDetails
The Knowledge Base details are located on the right side. The Details section includes: – The description of the Knowledge Base – The Data Responsibility Office – The Category
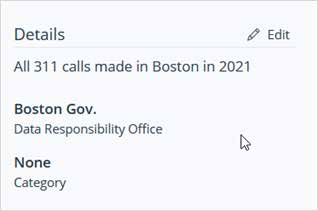
You can always click the Edit button on top, to edit details about the Knowledge Base.
3.2 Domains
The Domains represent the columns in your data set. A Knowledge Base can consist of any number of Domains. A Domain contains all values that are relevant to it.
Each data column in the data set must have a Domain created in Hedda.
The Domain tab is split into 3 sections: – Domain List – Member List – Details
Let’s looking at these sections more closely, starting from the Domain list section on the left.
3.2.1 DomainList
Here we have displayed the list of Domains that can be added using the “Add Domain” button on top.
On the right side of each Domain, small icons indicate the data type of the Domain, as well as whether it is read only, closed, or neither of the two.

The order of the Domains in the list can be changed by grabbing the handle on the left and moving them up or down.
To manually add Domains to the Knowledge Base, you must switch to the Edit Version of the Knowledge Base. Click HERE for more information on this topic.
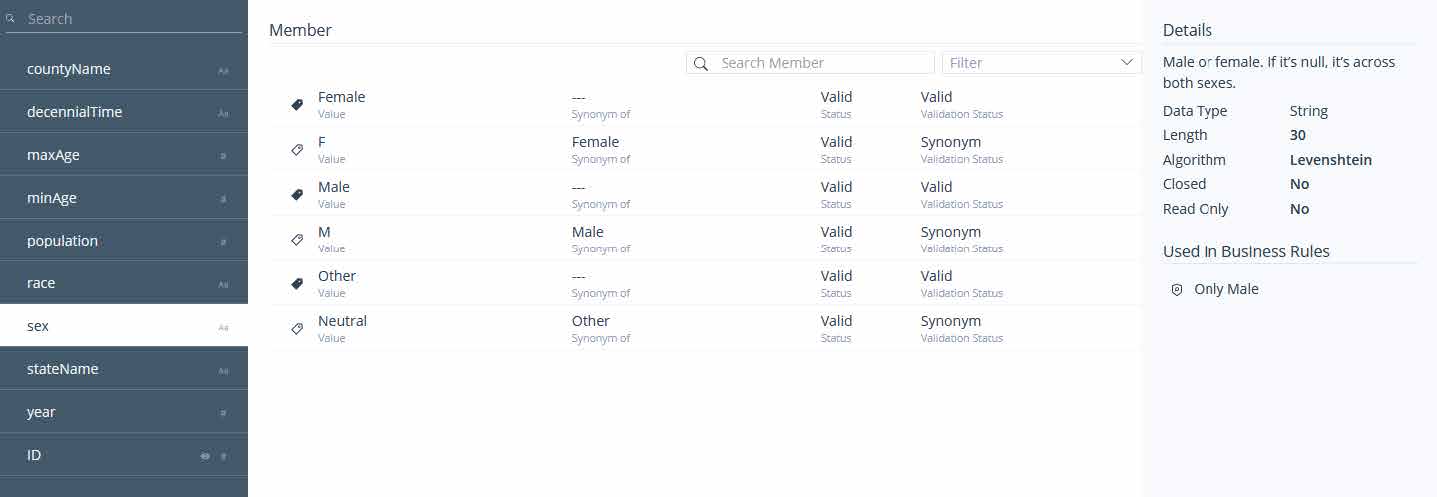
3.2.2 MemberList
3.2.3 DomainDetails
The details section includes the following metadata for the selected Domain.
- DataType
- Length
- Algorithm/PrecisionLabel
- Closed
- ReadOnly
This section also displays a list of Business Rules that that are created on this domain. There is an “Edit” button on the right, which allows you to edit the Domain.
3.3 Rulebook
The Rulebooks tab contains the list of Rulebooks created for the Knowledge Base, as well as a diagram for each of them.
The screen is split into 5 sections: – Rulebook list – Business Rules Diagram – Details – Business Rule List
3.3.1 AddRulebook
In order to add a new Rulebook, we need to edit the Knowledge Base.
This is done by clicking on the “Edit Version” button on the top-right corner of the current menu. For more information on the Knowledge Base Version Edit, click Here.
###Conditions-Dashboard
This section displays the Business Rules and the operators in a more compact style. We have the operator on the left, and the Business Rules, including the Domain the condition operator, and their values, listed on the right
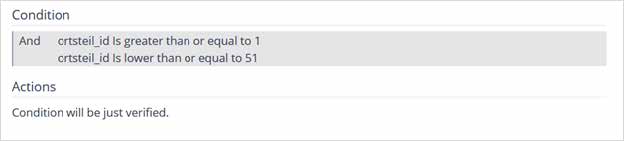
3.3.2 Actions-Dashboard
This section will display the Actions that will trigger when the value in a Domain meets the configured Business Rule. For example, in this case, there are no Actions configured. This means, that the condition will simply be verified, and no actions will be triggered.
3.3.3 BusinessRulesDetails
This section displays the description of the Business Rule, the Data Quality Dimension, and the Group to which the Business Rule is attached.
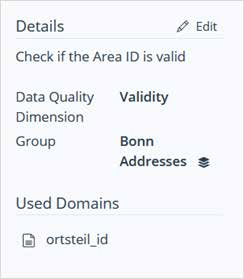
3.3.4 UsedDomains
Displays the list of Domains that the respective Business Rule does the check against.
3.4 Mappings
Mapping is an operation that associates Domains with columns from a dataset. The Mapping screen is split into 3 sections. – Mapping list – Mappings – Details
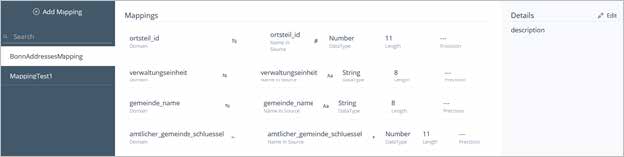
3.4.1 Mapping List
All Mappings are listed on the left side of the screen. The “Add Mapping” button is, as always, on top of the list.
Clicking on “Add Mapping” will open the “Add Mapping” window. Enter a Name and a Description for the Mapping. On the bottom side of the panel is where we can configure our Mapping.
Right under the “Select Domain” label, there’s a list of the available Domains listed horizontally.
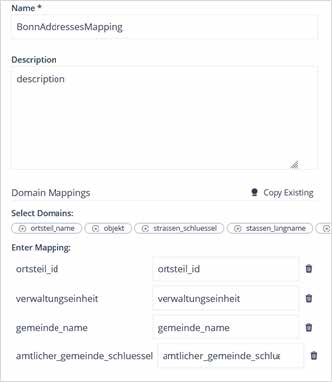
Click on any of them to add them to the “Enter Mapping” section.
If the column name in the dataset and the Domain in Hedda coincides, the Domains will require no editing.
Once all is done, click “Save”.
3.5 Runs
Here’s is where you can configure a Run, which is required when trying to run a dataset against a Knowledge Base.
The Runs screen layout is split into 4 sections. – Runs list – Overview – Details – Executions
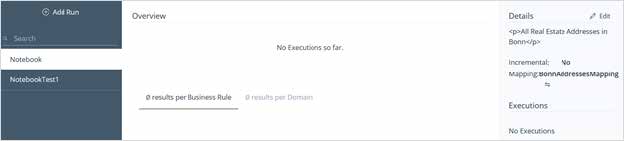
3.5.1 Run List
The Run list includes all the created Runs.
On top of the list is the “Add Run” button. Clicking on the button will open the “Add Run” panel.
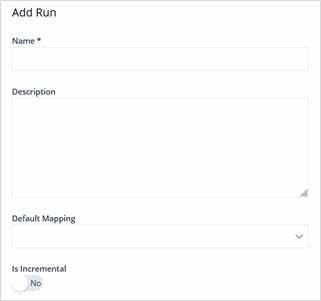
This panel has the following inputs:
- The name of the Run
- The description of the Run
- Default Mapping, which must be set up prior to creating a Run (more information in the previous capitol)
- A switch which indicates whether the Run is Incremental or not.
Once done, click “Save” on the bottom of the panel.
3.5.2 Runs Overview
The overview will display relevant information about all the Runs executed until that date.
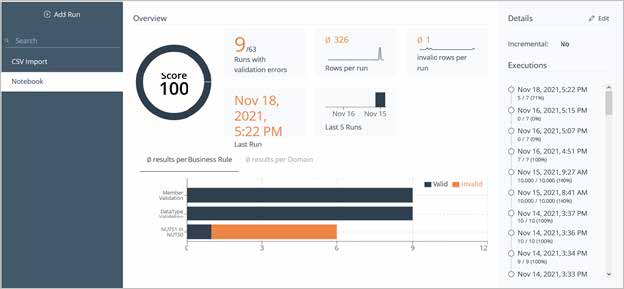
The overview section is packed with different statistics.
Here’s a list with all the different statistics available:
- Score
- Runswithvalidationerrors
- RowsperRun
- InvalidrowsperRun
- ThedateofthelastRun
- Last5Runs
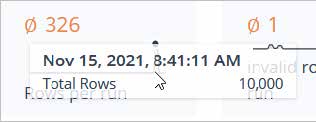
Hovering over each their visuals, will reveal detailed information.
On the bottom side of the overview there are two tabs, each containing different statistics: – Result per Business Rule – Result per Domain
3.5.2.1 Result per Business Rule
The Legend shows which color represents the valid and which represents the invalid entries. Then, each of the Business Rules used in every execution, will be displayed in this section, in a nicely designed horizontal column diagram.
3.5.2.2 Result per Domain
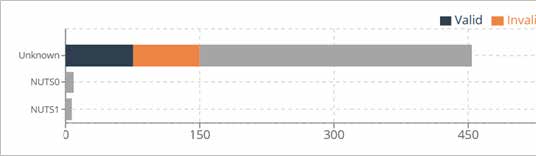
The Legend shows which color represents the valid, the invalid, and which color represents the new entries.
The diagram will display, one by one, statistics on columns from the dataset, that match a Domain in the Knowledge Base. If no match is found, the statistic will be displayed under the Unknown name.
3.5.3 Runs Details
The details section displays the metadata of the selected Run.
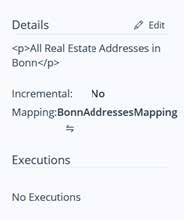
The section contains:
- The Description of the Run.
- Whether it is Incremental or no.
- The name of the Mapping being used.
- The list of executions.
Besides that, the “Edit” button will open the “Edit Run” panel.
Each item in the list of executions will have a Date and Time, which represents the moment in time it was executed, as well as the number of valid records / number of total records.
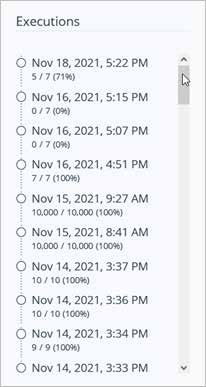
When clicking on any of these executions in the list, will open an additional panel, which will show advanced info about the execution.
As you can observe, the panel has a default “Info” tab and 4 additional ones. – Domain Statistics – Business Rules Statistics – Action Rule Statistics – Member Statistics
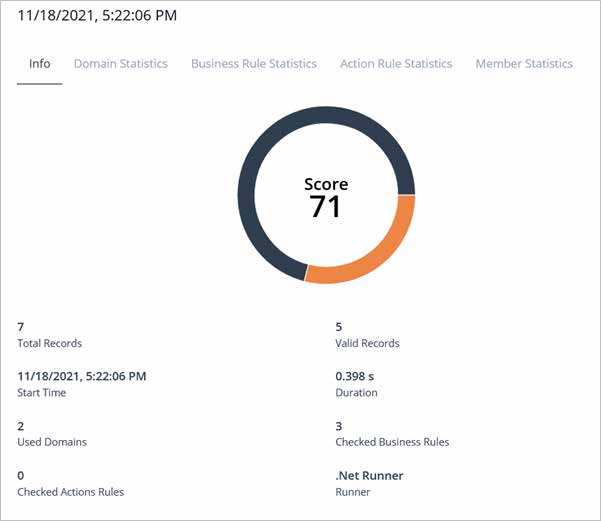
3.5.3.1 Info
This tab works as the overview of the execution.
Here’s what kind of info you can find on the info tab: – Score – Total Records – Valid Records – Start Time
– Duration – Used Domains – Checked Business Rules – Checked Action Rules – Runner
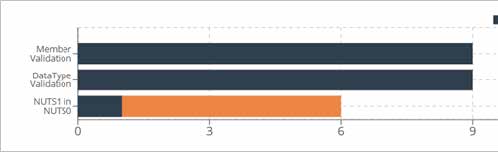
3.5.3.2 Domain Statistics
Here you can find statistics about the used Domains in the run.
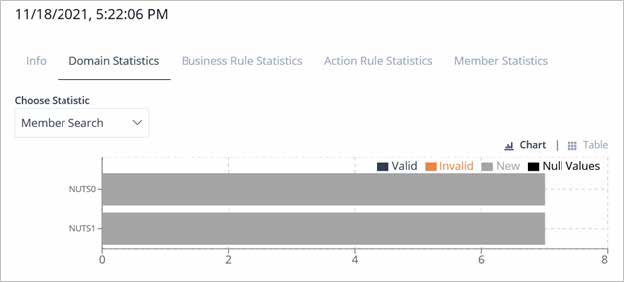
On top, you can choose to see statistics for Members or Data type validation.
The Legend will help understand which color was used for the Valid, Invalid, New, or New values.
On top of the Legend, you can see two options “Chart” and “Table” which adds an additional way you can read the statistics in the panel.
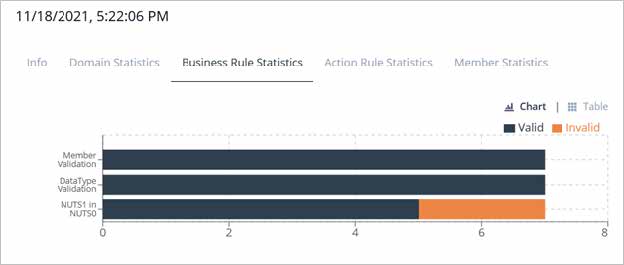
3.5.3.3 Business Rule Statistics
Here resides the statistics for every Business Rule used in the respective Run.
The Legend will help understand which color was used for the Valid, or Invalid values.
3.5.3.4 Action Rules Statistics
This will store the statistics for every Business Rule used in the respective Run, that used an Activity.
Just like in the previous tabs, you can see two options “Chart” and “Table” which adds an additional way you can read the statistics in the panel.
3.5.3.5 Member Statistics
This tab will record statistics on all the Members found, valid, invalid, and new.
You can select between 5 filters:
- New
- New with match
- New without match
- Matched
- All
The horizontal column diagram will display Members according to the selected filter.
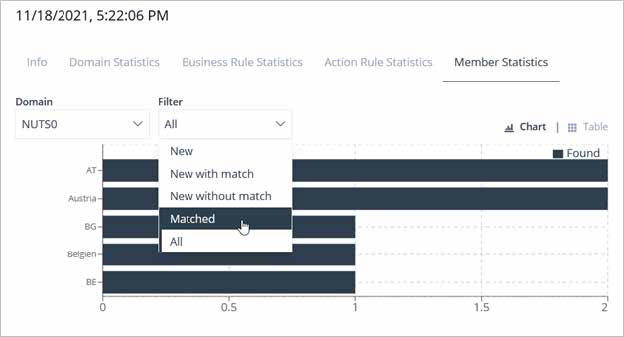
The Legend will only display one color, which represent the Found items.
4. Edit Knowledge Base
The Knowledge Base is the central starting point if you want to start quality assurance within your data. The various functions of Hedda are logically grouped or thematically combined in the Knowledge Base.
When accessing a Knowledge Base, you will be presented with the Knowledge Base screen, where you can add Domains, Members to the Domains, Business Rules, Runs, Mappings, as well as edit the Knowledge Base details.
The screen has 5 tabs you can switch between:
- Dashboard
- Domain
- Rulebooks
- Runs
- Mappings
Additionally, on the top-right corner, we have a very important button that reads “Edit Version”. This button will open up an Editable Version of the Knowledge Base, in which you can add Domains, Members, Rulebooks, and Business Rules.

We will go through each of these tabs and explain the functionality on each of them. But first, it is important that we show you how “Edit Version” works.
4.1 Edit Version / Edit Knowledge Base
This is the menu that allows you to add and edit Domains, Members, Rulebooks, and Business Rules.
When we click on “Edit Version”, we are presented with 3 tabs: – Dashboard – Domains – Rulebooks
4.1.1 Edit Version – Dashboard Tab
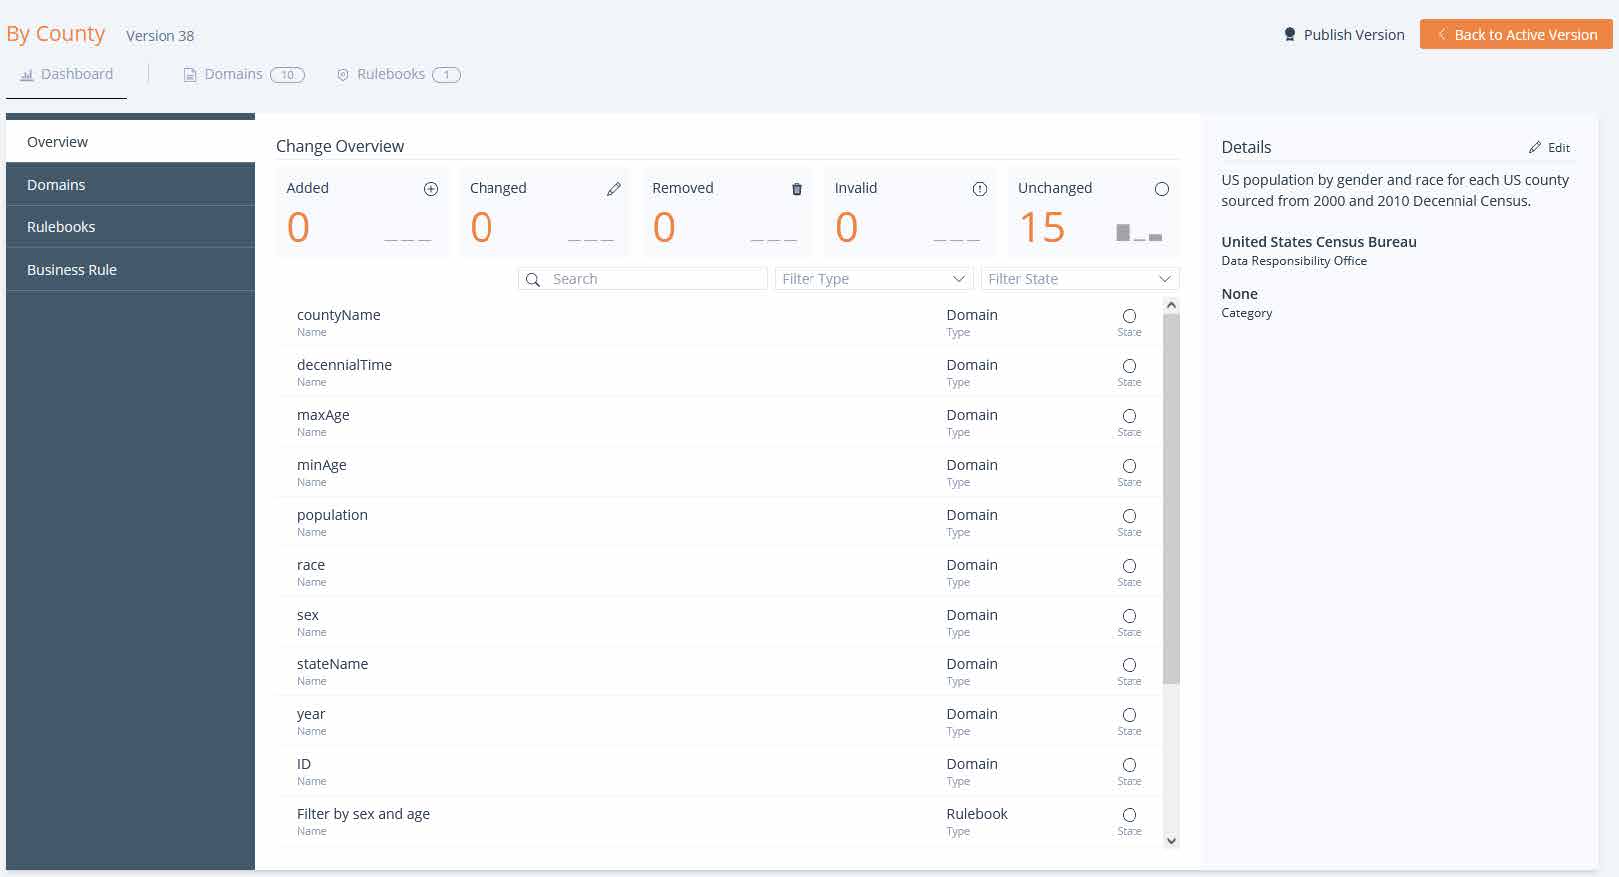
The dashboard will display information about the knowledge base version, as well as details about the Domains, Rulebooks, and Business Rules. Clicking on each of the buttons on the left side-menu will display and overview for each.
4.1.2 Edit Version – Domains Tab
The Domains menu interface in the Version Editor looks exactly like normal one, except that here we are given the option to Add Domains.
 4.1.2.1 Add Domains
Clicking on the “Add Domain” button, opens the “Add Domain” panel.
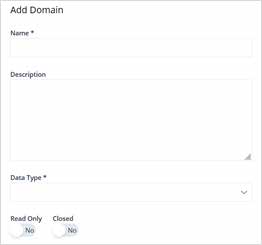
This panel has 3 inputs and 2 switches.
- Name
- Description
- Data Type
- Read Only (switch)
- Closed (switch)
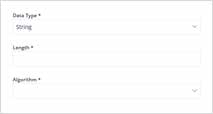
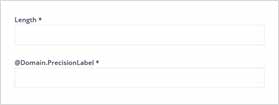
Selecting data type “String”, two additional inputs will appear allowing you to enter the Length of the value and the Algorithm.
4.1.2.2 Algorithms
What algorithms do in Hedda.io?
When you validate data against a Domain, the validator first checks if the exact Member already exists. If this Member is found, it is returned as a valid value. If the Member is a synonym and thus assigned to a master, the master is returned as a valid value.
If the corresponding Member is not found, the validator uses the algorithm defined for the Domain to check which existing synonym or master it corresponds to. If the validator finds a Member here, it will return it as valid together with a threshold. The threshold defines the probability how the two Members match.
If the match itself is a synonym, the master is returned to you. The corresponding threshold still refers to the probability to the original synonym.
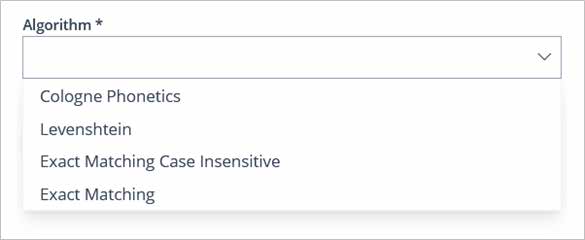
Depending on what data you use in your Domain, you can significantly improve the results by choosing the right algorithm. Phonetic algorithms such as Cologne Phonetics can usually be used very well for the name of a product.
If you store product numbers in your Domain, the use of a distance algorithm such as Levenshtein Distanz can lead to success.
With telephone numbers, on the other hand, even small differences often lead to completely wrong results, so that the best algorithm is the exact match.
Selecting data type “Number”, two additional inputs will appear allowing you to enter the Length of the number and the Precision Label which represents the length of the fraction digits.
4.1.2.3 Members
Additionally, the Domains tab allows us to add Members.
- There are 3 means by which Members can be added to the list.
- Import Stage
- Paste from Excel – Add
Member
Both these options are available in the top right corner of the Members section.
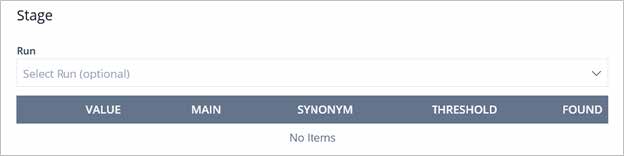
4.1.2.4 Import Stage
This allows you to import values that were newly found in previous Runs.
4.1.2.5 Paste from Excel
This option allows you to paste entire columns of values from an excel file.
Once you’ve accessed the “Paste from Excel” panel, simply click within the space shown on the left, then press Ctrl + V.

The values should be displayed as shown in the image example below.
The “Value Column” drop-down will allow the user to select one of the multiple columns of data that was pasted if it’s the case. In this case, we’ve only pasted one, meaning that there is only one column to be displayed, and the drop-down is showing only one.
The “Synonym of Column” drop-down allows the user to select the column that contains the main Members. This would only be used when the column with the Main values was added in advance.
Important note! When adding the synonym columns, it is mandatory that you select the column with the main values as well, before pasting the values into the Drag&Drop component.
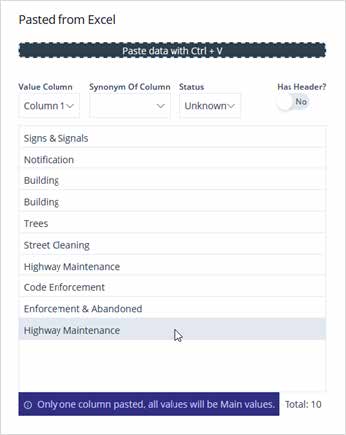
The “Status” drop-down will allow you to select whether the Members are Valid, Invalid, or Unknown (which is selected by default).
Finally, on the far right, we have the “Has Header” slider which when turned on, will set the top row of the column as header, therefore will name the pasted columns with their respective header names.
Once All is set, click on “Save All” on the bottom of the dialog.
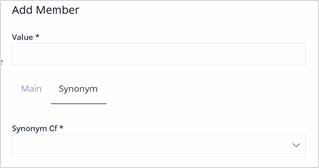
4.1.2.6 Add Member
This will allow you to add Members one by one, as well as their synonyms if it’s the case.
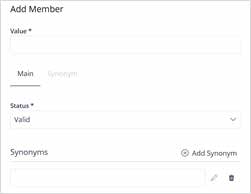
Everything is done in this simple dialog.
The Value label represents the value that is allowed or not for the respective Domain.
In the middle of the panel, there are two buttons called “Main” and “Synonym” which when pressed, will switch to a different set of inputs.
These are used to define what type of Member we are trying to add.
While on the “Main” tab, we can add synonyms. Simply click on the “Add Synonyms” button and enter the value for the synonym. The synonyms can be deleted and edited.
While on the “Synonym” tab, you can see the “Synonym Of” dropdown, which allows you to select the Main Member this synonym belongs to.
Now, let’s move back to the Member’s list.
The Member object/element in the list displays metadata for the respective Member, which includes:
- The name of the Member.
- The name of the main Member when the Member type is a synonym.
- The status.
- The validation status.

Additionally, the icon on the left shows what type of Member it is. The dark icon means it is a main Member, while the light icon means the Member is a synonym.
The element also has an edit and a delete button on the right. Clicking on the “Edit” button will open the “Edit Member” dialog, where the used can edit the respective existing Member.
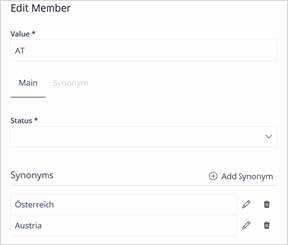
In the “Edit Member” dialog, you can manually add synonyms one by one. Simply click on the “Add Synonym” button as shown below.
4.1.3 Edit Version – Rulebooks Tab
In order to add a new Rulebook, we need to edit the Knowledge Base.
This is done by clicking on the “Edit Version” button on the top-right corner of the current menu. For more information on the Knowledge Base Version Edit, click Here.
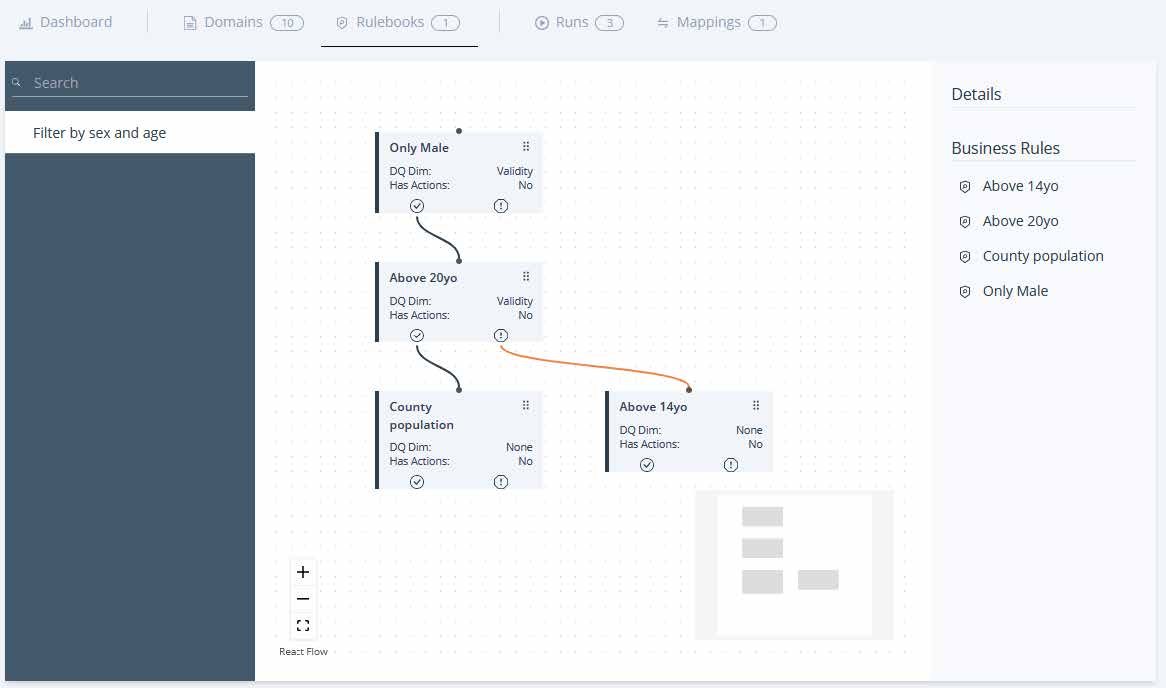
4.1.3.1 Rulebook Canvas / Diagram
The canvas is host to the business rules this rulebook contains. You can create multiple business rules and link them between each other. Even more, you can have business rule flow, which that you can have rules that can be checked based on the outcome of a previous rule.
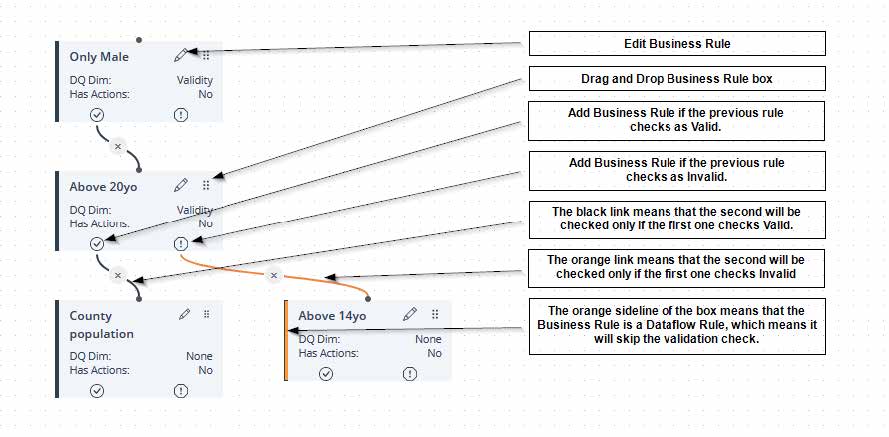
We’ve included details about each of the icons and buttons in the screenshot above.
4.1.4 Add Rulebook
Once in the edit menu, click on the Rulebooks tab and notice the “Add Rulebook” button in the top section of the sidebar menu on the left.

Once the “Add Rulebook” button is clicked, a panel will slide from the right, allowing you to enter a Name and a Description for the Rulebook.
Pressing the Save button on the bottom of the panel, will add the Rulebook to the list, will then add a default first Business Rule, and will open the Edit Business Rule panel for you to edit the default Business Rule in the Rulebook.
4.1.5 Add Business Rule
Adding a second Business Rule to a Rulebook will require you to link it with the default or an already existing Business Rule. This means that in order to add the rule, you must click on one of the following icons on an existing Business Rule, depending on when do you want the rule to be checked.
Clicking on the Checkmark icon will have the new Business Rule checked if the previous rule is Valid. Clicking on the Warning icon will have the Business Rule checked when the previous rule is Invalid.
The Add Business Rule panel is split into 3 sections:
- Basic Business Rule info
- Condition
- Actions
4.1.6 Basic Business Rule Info
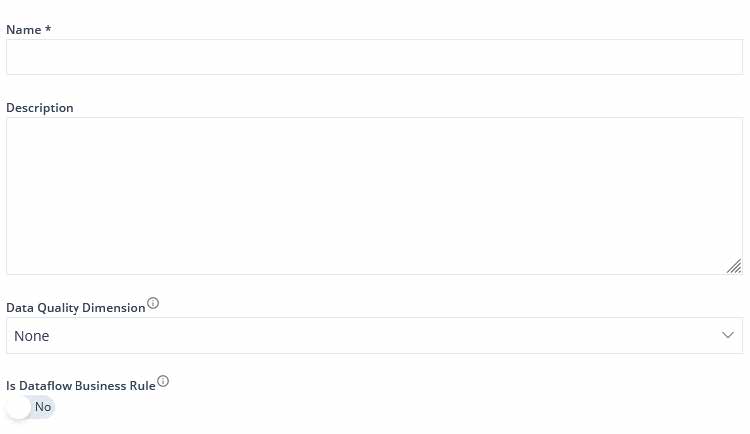
The Basic Business Rule info section has the following inputs:
- Name
- Description
- Data Quality Dimension (drop-down) – Accuracy – Completeness – Consistency – Timeliness – Uniqueness – Validity – None
- Is Dataflow Business Rule (toggle slider)
– If toggled on, this Business Rule will not be taken into account for Validation.
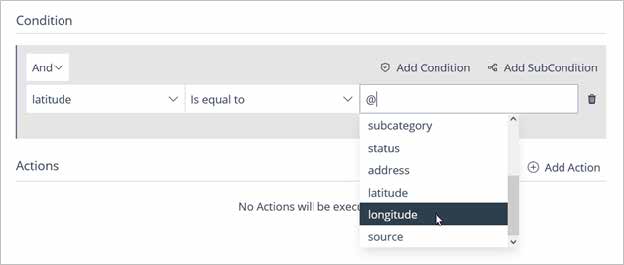
4.1.7 Condition
This section of the panel is where the Business Rule conditions are defined.
- First, select the operator And or Or.
- Click on “Add Condition”
- Select a Domain
- Select a condition
- Enter a Value (the value can be another column)

Repeat the process for every additional Business Rule. You can also add sub-conditions which will nest inside the existing conditions.
Here is a list of conditions that are available for selection, depending on the type of Domain you select when configuring a condition.
| Conditions | Description |
|---|---|
| And |
All conditions must be met. |
| Or |
At least one condition must be met. |
|
Contains |
Text must contain the value. |
|
Has Date format |
Can be Parsed as Date. |
|
Ends with |
Text ends with the value. |
|
Is equal to |
Both values must be equal. |
|
Is greater than |
Left value must be greater. |
|
Is greater than or equal to |
Left value must be greater or equal. |
|
Is one of |
Value must be one of the comma separated sequence. |
|
Has exact length of |
Text must have the exact number of characters. |
|
Is lower than |
Left value must be lower. |
|
Is lower than or equal to |
Left value must be lower or equal. |
|
Has maximum length of |
Text must not exceed the maximum number of characters. |
|
Has minimum length of |
Text needs the minimum number of characters. |
|
Is not equal to |
Both values must not be equal. |
|
Is none of |
Value must not be one of the comma separated sequence. |
|
Is not null |
Value is not NULL. |
|
Not Matches pattern |
Text must not match the pattern. |
|
Not Matches Regex |
Text must not match the Regex pattern. |
|
Is null |
Value is NULL. |
|
Matches pattern |
Text must match the pattern. |
|
Matches Regex |
Text must match the Regex pattern. |
|
Starts with |
Text starts with the value. |
Important Note! The Value can also be equal to the value for another Domain in the same Knowledge Base. To do so, simply write **@**, a dropdown will then present you with the available Domains to choose from. See the screenshot below.
4.1.8 Action
In this section of the panel, you can add Actions, which will be triggered whenever the value in the respective Domain will meet the condition/s of the Business Rule.

4.2 Publish Version
Once all you need has been added or changed, you must click the Publish Version button in the top-right corner of the screen.

You can choose to ignore the changes you made and go back to the version that was previously published, or the Active version.